Understanding Garden Windows vs. Other Projection Styles
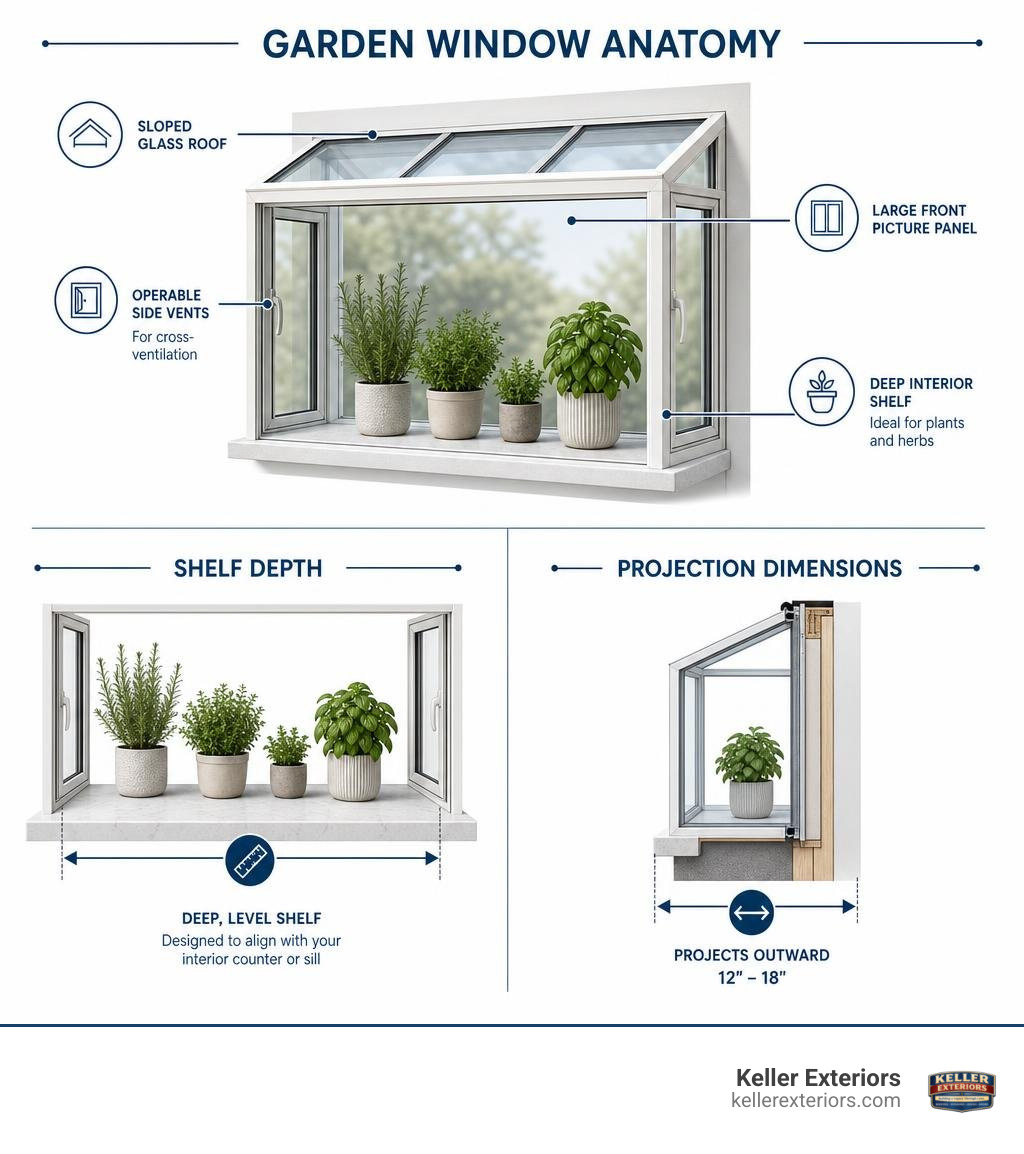
Garden windows offer a distinct look and purpose compared to other architectural styles. Designed as a three-dimensional glass box, a garden window extends outward from your exterior wall at a sharp 90-degree angle. This structure typically includes a sloped glass roof, a large front picture panel, two operable side vents for cross-ventilation, and a deep interior shelf. Because the entire box is made of glass, it acts like a miniature indoor greenhouse, maximizing natural daylight from multiple directions.
Homeowners often compare garden windows to bay and bow windows, but their form and everyday function are quite different:
- Garden Windows: Feature five or more individual glass panels arranged at 90-degree angles. They project outward 12 to 18 inches, with 17 inches being the most common standard depth. The built-in shelf sits level with your interior counter or sill, specifically designed to hold potted plants and herbs.
- Bay Windows: Typically consist of three large panels angled outward at 30, 45, or 90 degrees. Bay windows are larger architectural additions meant to extend interior floor space or create cozy seating areas rather than display plants.
- Bow Windows: Feature four to six window panels set in a gentle, rounded curve. They maximize wide panoramic views and exterior elegance without the sharp angles or deep display shelf found on garden units.
For unusual openings or distinctive exterior details, custom window options can help create a replacement that fits the home properly. Before choosing a projecting unit, verify that it will not interfere with a walkway, patio, or outdoor living area. Larger projections also need solid structural support underneath to keep the unit level and prevent the bottom seat board from sagging over time.
Evaluating Your Garden Window Replacement Needs: Signs of Failure
Because garden windows project outward and feature multiple glass panels, they face harsh weather from every angle. Identifying early warning signs of failure can save your home from serious moisture damage behind the drywall.
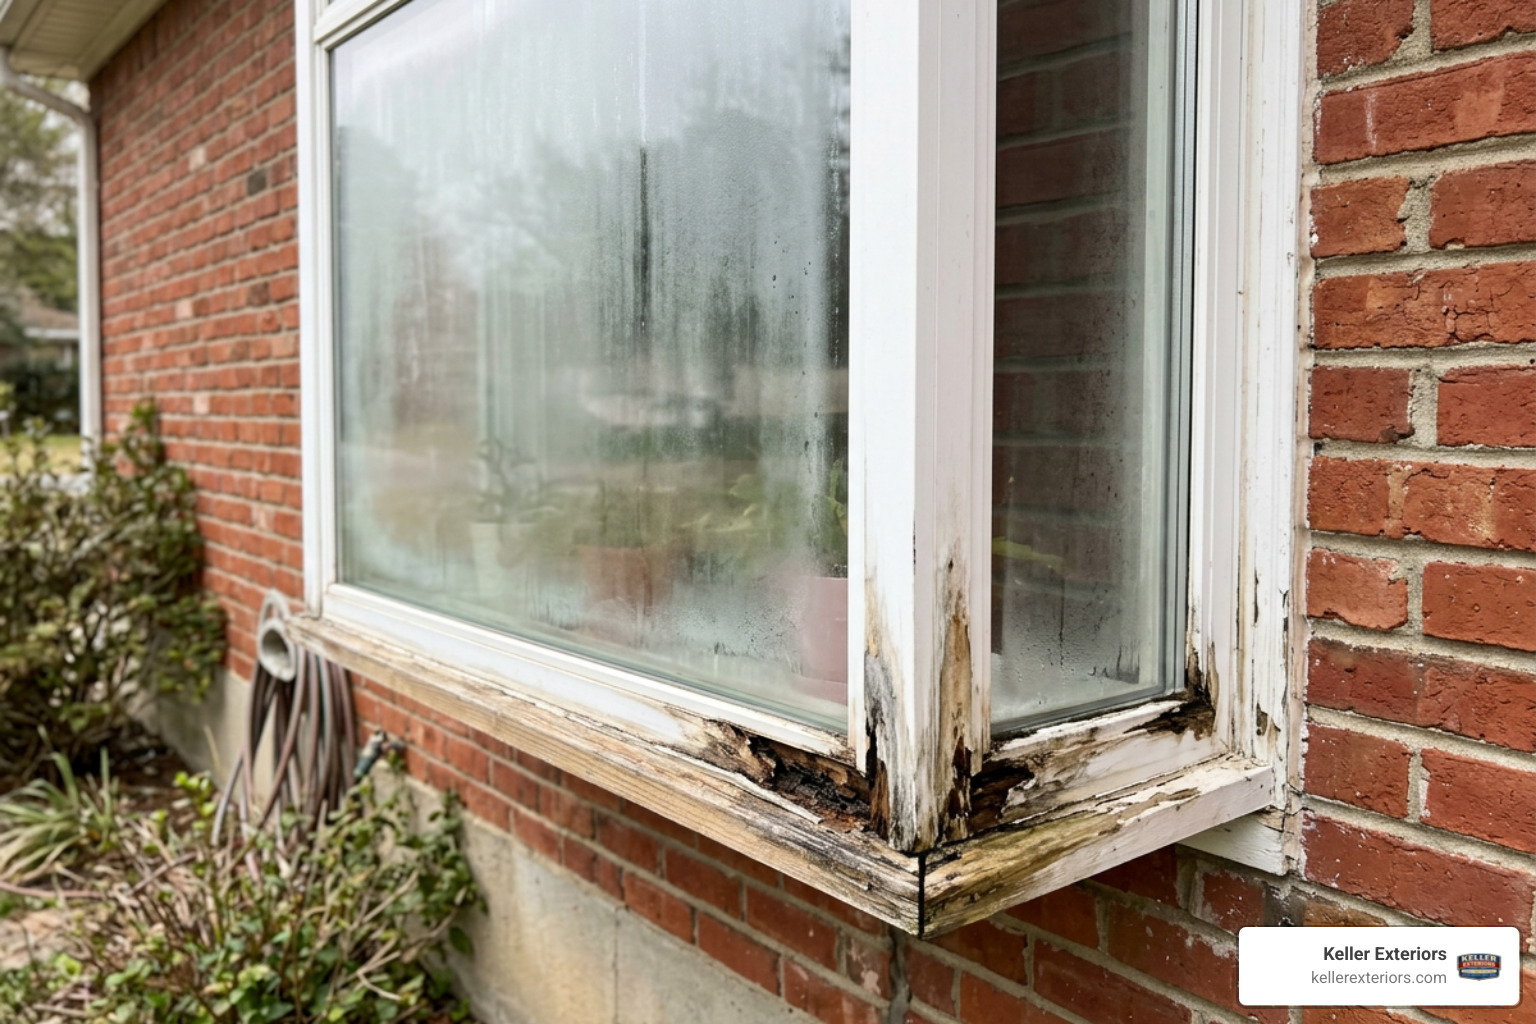
- Broken Thermal Seals and Inter-Pane Fog: If you notice persistent condensation, haze, or mineral deposits trapped between the glass panes, the insulated glass unit has lost its airtight seal. A broken seal cannot be patched or recharged; once the insulating gas escapes, the glass loses its thermal value, making replacement the only lasting fix.
- Wood Rot and Soft Framing: Press lightly along the bottom seat board and interior frame. If the wood feels spongy or shows dark staining, water has infiltrated the assembly. Left unaddressed, rot spreads into the home’s structural jack studs and subflooring.
- Drafts and Temperature Swings: Cold air washing over your kitchen counter in winter or intense heat radiating through the top glass in summer signals failing weatherstripping or inadequate glazing.
- Structural Sagging or Binding Sashes: If the side casements stick, bind, or refuse to latch properly, the projecting box may be sagging away from the house due to rotted framing or missing cantilever brackets.
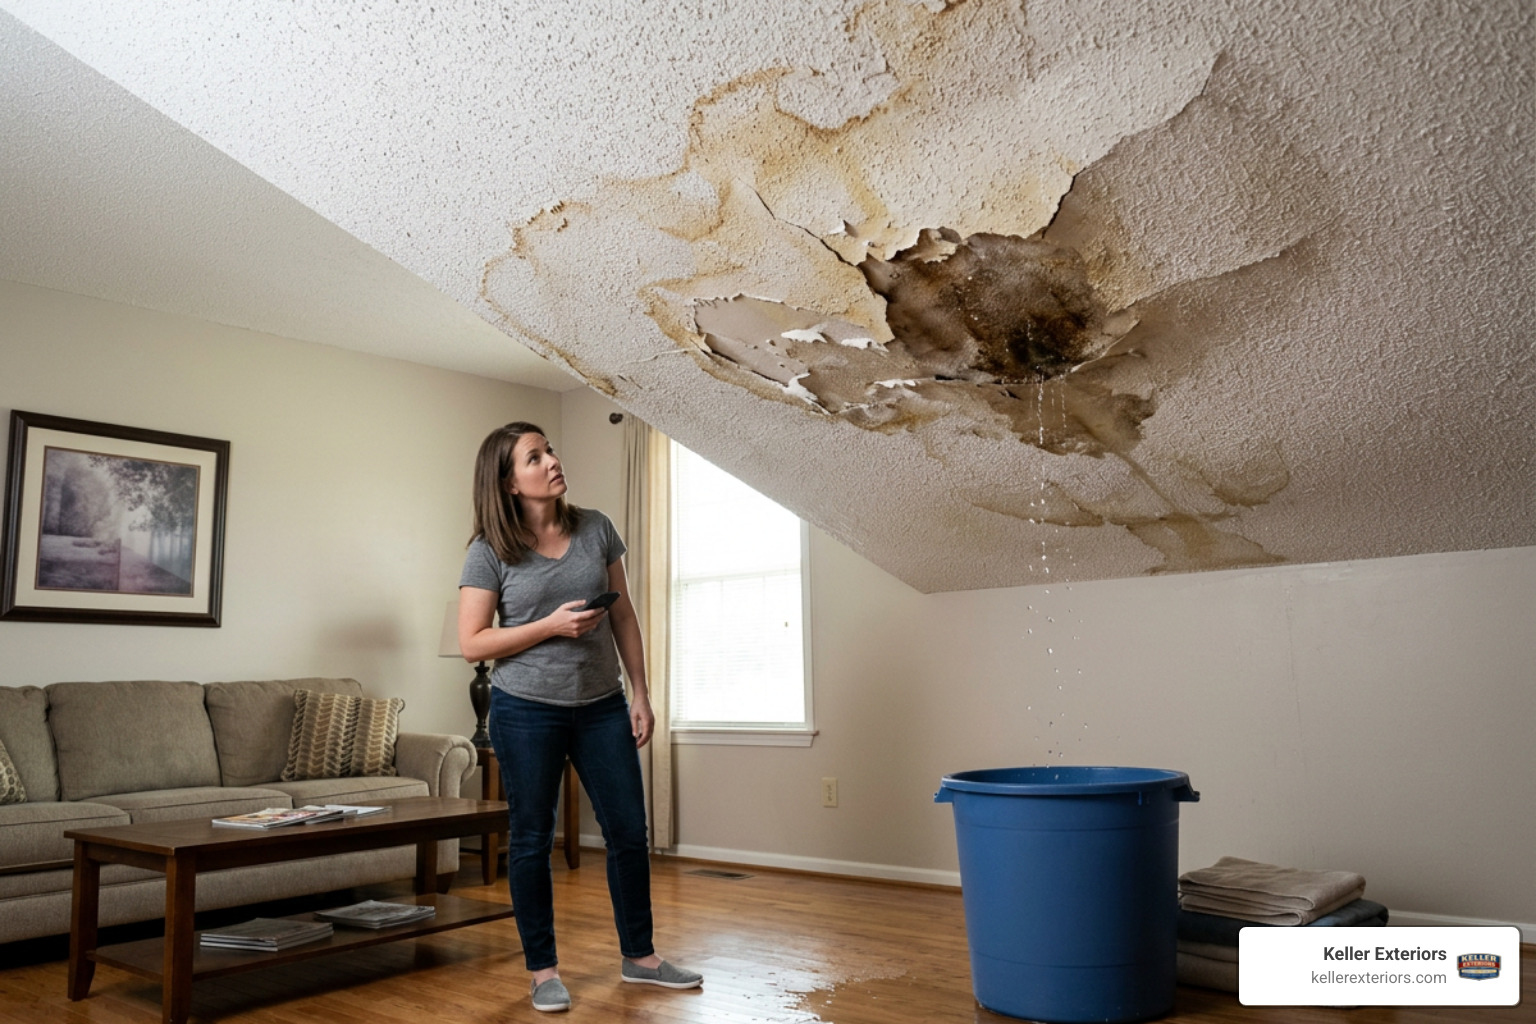
- Peeling Paint, Mold, and Drywall Stains: Water pooling beneath the window sill or dark mold spots along the lower wall indicate active leaks around the exterior flashing system.
If you are weighing repair against replacement after visible damage, the details in our broken window replacement article can help you recognize when a full unit swap makes more sense.
Comparing Materials and Glass for Your Garden Window Replacement
Choosing the right frame material determines how well your new garden window stands up to moisture, temperature shifts, and daily use. Kitchens naturally produce steam from cooking and dishwashing, while the plants inside the window add extra humidity.
| Frame Material | Durability Level | Thermal Insulation | Maintenance Needs | Best For |
|---|---|---|---|---|
| Vinyl | High (Rot-proof, moisture-resistant) | High (Multi-chambered insulating frames) | Very Low (Occasional soap and water cleaning) | Kitchens, humid spaces, cost-effective longevity |
| Wood-Clad | Moderate to High (Requires exterior seal care) | Very High (Natural wood interior insulation) | Moderate (Interior sealing, exterior inspection) | Traditional interiors, stain-matching wood trim |
| Composite | Superior (Extremely rigid, weather-resistant) | High (Resists thermal expansion and contraction) | Very Low (No painting or staining required) | Harsh climates, large openings requiring extra strength |
| Aluminum | Moderate (Durable metal, but prone to heat transfer) | Low to Moderate (Requires thermal breaks) | Low (Corrosion-resistant finishes) | Mild climates, commercial or contemporary designs |
Modern vinyl windows are the top choice for kitchen garden window replacements. Vinyl frames will not rot, peel, or corrode when exposed to plant drainage or kitchen steam. They feature fusion-welded corners and internal chambers that trap air, preventing outside temperatures from conducting through the frame.
Wood-clad options provide warm, natural wood on the inside with a weather-resistant aluminum or vinyl shield on the exterior. While beautiful, they require vigilant upkeep to ensure plant watering never damages the wood finish. Composite frames combine wood fibers and durable polymers, delivering high structural rigidity without the threat of rot. Standard aluminum frames should generally be avoided in residential settings unless they feature a built-in thermal break, as uninsulated metal quickly transfers cold winter air into your kitchen, causing heavy interior condensation.
Energy Efficient Glass and Glazing Options
Because garden windows consist of five to seven glass panels, your glazing choices make a tremendous difference in household comfort and monthly utility costs. A single uninsulated pane creates extreme temperature swings that can quickly wilt delicate houseplants.
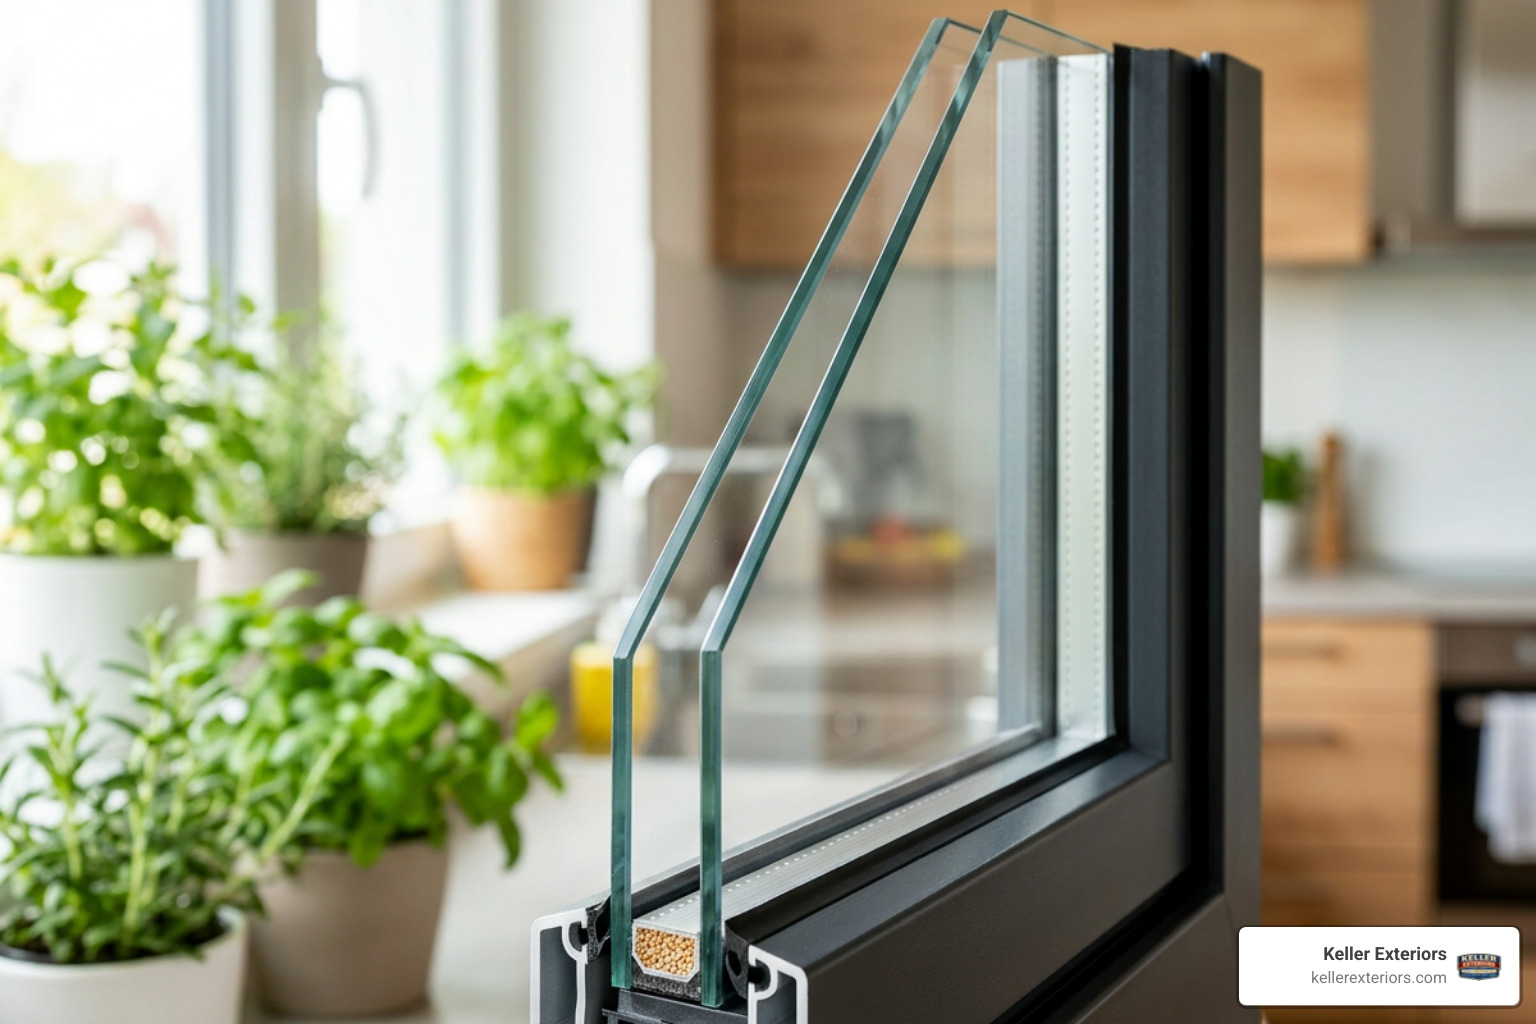
- Low-Emissivity (Low-E) Coatings: Microscopic metallic coatings reflect radiant infrared heat. According to the U.S. Department of Energy, improving window performance can help reduce unwanted heat gain and loss. In summer, Low-E glass keeps blistering exterior heat outside; in winter, it bounces interior heat back into your living space while blocking harmful UV rays that scorch foliage.
- Argon Gas Fills: Replacing the air between glass panes with non-toxic argon gas dramatically slows convective heat transfer, boosting the overall thermal efficiency of the window.
- Double-Pane vs. Triple-Pane: Double-pane glass with Low-E and argon is the standard baseline for dependable performance. For maximum draft protection and noise reduction, upgrading to triple pane windows adds a third glass layer and two insulating gas chambers, creating an exceptional barrier against cold winters and hot summers.
- Solar Reflective Glazing: If your window faces directly south or west, solar reflective windows help regulate intense solar heat gain while preserving crystal-clear natural views for your indoor garden.
Sizing and Planning Considerations for Garden Window Replacement
Proper sizing and installation complexity shape the scope of a garden window replacement. Standard stock garden window sizes range from compact 24-by-24-inch units to larger 60-by-48-inch openings, while custom units can accommodate unusual wall layouts and existing trim details.
A replacement project typically includes several planning considerations:
- The Window Unit: Frame material, custom dimensions, glass coatings, and interior finishes, such as birch, oak, or waterproof laminate seat boards, affect the final design.
- Installation Requirements: A professional installer must remove the old unit, inspect and repair framing when needed, install exterior support systems, and integrate flashing correctly.
- Structural and Rough-Opening Modifications: If the original framing has water damage, damaged jack studs, headers, or subflooring may need replacement. Resizing a wall opening also requires carpentry work.
Accurate measurements are vital before ordering. Measure the rough-opening width across the top, middle, and bottom, using the smallest number. Repeat this process for the height from the header to the sill at the left, center, and right. Finally, measure the diagonal corners. If the two diagonal measurements differ by more than 1/8 inch, the frame is out of square and will require shimming or framing adjustments during installation.
Converting a Garden Window to a Standard Window Style
If your old garden window has become a recurring maintenance headache, converting the opening to a flat, traditional window is a practical alternative. Swapping out a projecting box for a flush window simplifies exterior maintenance and eliminates the need for exterior support brackets.
A window replacement service consultation can help determine whether the existing rough opening can support a new garden unit or whether a flat style will provide a better long-term fit.
Popular conversion styles include:
- Double-Hung Windows: Classic and easy to clean, double-hung windows allow you to open both top and bottom sashes for excellent vertical airflow control.
- Casement Windows: Cranking outward on side hinges, casement windows capture passing breezes and provide a tight, compression-sealed barrier against drafts and driving rain.
- Sliding Windows: Ideal over deep kitchen sinks where reaching up to push a sash can be difficult, sliding windows glide smoothly along a horizontal track.
For a closer look at how custom dimensions and window styles affect a replacement plan, our custom replacement window comparison explains the options homeowners should review before selecting a unit.
When converting to a flat style, the existing rough opening often needs minor framing adjustments to fit standard dimensions. The exterior siding must also be patched where the projecting box was tied into the house, but the overall project timeline remains straightforward.
Installation, Flashing, and Ventilation Best Practices
Waterproofing is the single most important part of any garden window installation. Because the top glass slopes downward toward the front, water naturally runs off the roof and across the exterior seams. Without proper flashing, water will find its way behind the siding and rot your home’s structural framing.
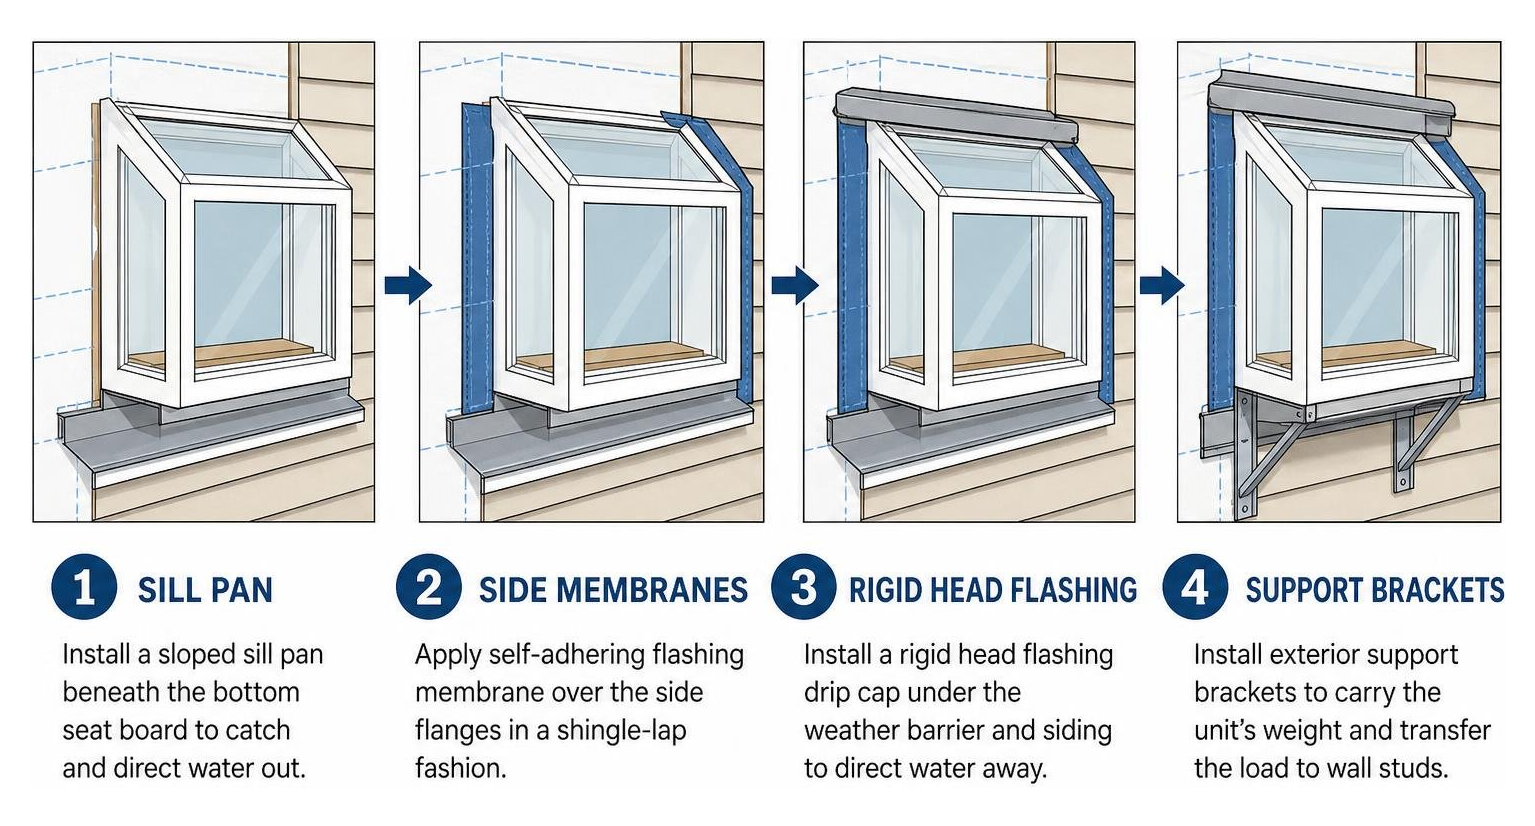
- Rigid Head Flashing: A corrosion-resistant metal drip cap must be installed along the top edge of the window, slipping underneath the existing exterior weather barrier and siding. This directs running rainwater safely away from the top glass seam.
- Flexible Self-Adhering Flashing Membrane: High-grade flashing tape should overlap the side nailing flanges in a shingle-lap fashion, ensuring water always flows outward over the lower layer.
- Sloped Sill Pan: A preformed or site-built sill pan beneath the bottom seat board catches any incidental moisture and guides it harmlessly to the exterior.
- Weep Hole Clearance: Garden window frames include built-in weep holes along the bottom track to drain internal condensation. Never apply caulk over these weep holes, as sealing them traps water inside the frame, accelerating rot and seal failure.
- Structural Support Brackets: Because garden window units weigh between 80 and 120 pounds before adding potted plants and moist soil, exterior corrosion-resistant support struts or bottom knee brackets are essential. These brackets transfer the cantilevered load back to the home’s structural wall studs.
Step-by-Step DIY vs. Professional Garden Window Replacement
While replacing a standard flat insert can be a weekend DIY task for an experienced homeowner, garden windows present significant structural and waterproofing challenges. Understanding the step-by-step process helps you decide whether to take on the project or hire an experienced exterior contractor.
- Preparation and Workspace Protection: Clear the entire counter, remove shelving, and lay heavy drop cloths inside and outside the work area.
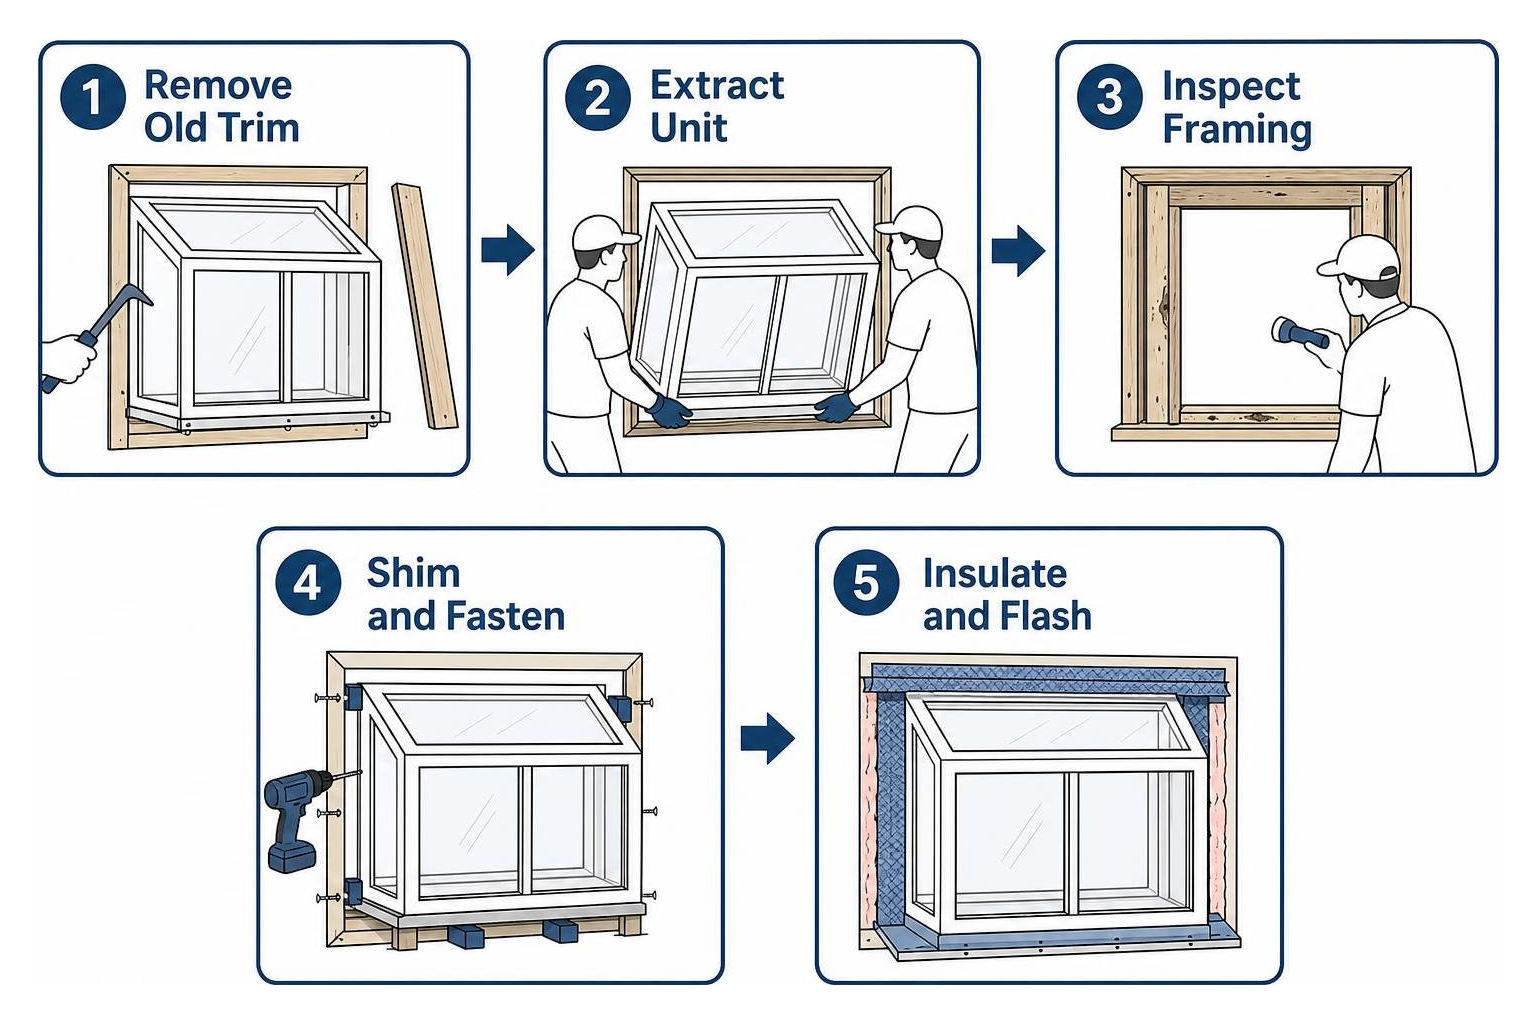
- Careful Extraction: Cut through interior and exterior caulk lines using an oscillating multi-tool or utility knife. Unscrew the unit from the framing. Because of the bulk and weight, use a coordinated two-person lift to carefully ease the old window out of the rough opening.
- Framing Inspection and Repair: Inspect the exposed header, jack studs, and sill plate for softness, rot, or mold. Replace any damaged framing lumber before proceeding.
- Dry Fitting and Shimming: Set the new unit into the opening on support blocks. Use composite shims under the sill and along the side jambs until the unit is plumb, level, and square within 1/8 inch.
- Securing the Unit: Drive structural screws through the pre-drilled mounting holes into the framing studs, taking care not to overdrive fasteners and bow the frame. Attach exterior support brackets securely beneath the seat board.
- Insulating the Perimeter Gap: Fill the gap between the window frame and rough opening with low-pressure, minimal-expanding foam. Avoid standard high-expansion spray foam, which can warp the vinyl jambs and jam the operable side vents.
- Weatherproofing and Sealing: Install rigid head flashing and side flashing membranes. Apply high-grade exterior polyurethane or silicone sealant along the outer trim perimeter while keeping the sill weep holes open.
DIY Risks to Consider: Attempting this installation alone carries risks of glass breakage, personal back strain, out-of-square framing that causes window binding, and improper flashing that leads to costly hidden wall rot. Professional installers bring the proper scaffolding, structural fasteners, and weatherproofing expertise to complete the job safely and back their work with warranties.
Optimizing Ventilation and Plant Selection by Exposure
A well-designed garden window creates a thriving microclimate for indoor plants while keeping your home comfortable. Controlling humidity and selecting plants tailored to your window’s sun exposure ensures healthy greenery year-round.
- Ventilation Management: Operating the side casement sashes creates a natural convection current, drawing cool air in through one side and exhausting warm, humid air out the other. Keeping air moving prevents stagnant moisture from condensing on the glass roof.
- Waterproof Protection: Always place potted plants in waterproof trays or decorative ceramic saucers with drainage gravel. Never let watering runoff sit directly on wood-veneered seat boards.
- Southern Exposure (High Direct Sun): Ideal for culinary herbs like rosemary, thyme, oregano, and basil, as well as desert succulents and cacti that thrive in full, bright sunlight.
- Eastern Exposure (Gentle Morning Sun): Perfect for delicate flowering plants, African violets, orchids, and leafy greens that enjoy bright morning light without scorching midday heat.
- Northern or Western Exposure (Low or Intense Late Sun): Northern windows provide cool, indirect light well-suited for ferns, pothos, and snake plants. Western windows bring intense late-afternoon heat, making built-in mini blinds or solar reflective coatings beneficial for plant health.
Frequently Asked Questions About Garden Window Replacement
How much does a garden window replacement cost in 2026?
Overall costs depend on the frame material, unit size, glass packages, and any required framing or rot repairs. Premium materials like wood-clad or composite units with multi-pane Low-E glass fall at the higher end of the spectrum, while standard vinyl models provide dependable performance at a more accessible investment level.
What is the main difference between a garden window and a bay window?
A garden window is a box-like projection with 90-degree side panels, a sloped glass roof, and a deep built-in display shelf designed for plants. A bay window features three larger panels angled at 30 to 45 degrees, designed primarily to extend interior floor space and living areas.
Can I replace my leaking garden window with a standard flat window?
Yes. Homeowners frequently replace leaking garden units with flat double-hung, casement, or sliding energy efficient windows. This conversion simplifies exterior maintenance, eliminates protruding boxes, and integrates smoothly into your existing wall framing with minor trim and siding adjustments.
Why do garden windows leak more often than other window types?
Garden windows project out from the exterior wall and feature five or more glass joints and seams, including a sloped roof exposed directly to overhead rainfall. If the rigid head flashing fails, caulking degrades, or bottom weep holes become clogged with dirt, water can penetrate the wall cavity.
How do I accurately measure for a replacement garden window?
Measure the width of the rough opening across the top, middle, and bottom, recording the smallest measurement. Measure the height from the sill to the top header on the left, center, and right. Check the diagonal corners to ensure the opening is square within 1/8 inch, and measure exterior clearance for the 12 to 18-inch projection.
What frame material is best for high-moisture kitchen garden windows?
Vinyl and composite frames are the best options for high-moisture settings. Unlike natural wood, they will not warp, rot, swell, or peel when exposed to kitchen steam, boiling pots, or plant watering runoff.
Do replacement garden windows require exterior support brackets?
Yes. Because garden windows cantilever 12 to 18 inches past the exterior wall and weigh between 80 and 120 pounds empty, they require corrosion-resistant bottom support brackets or struts. These brackets transfer the weight of the window, glass shelves, and heavy potted plants securely back to the structural wall studs.
Can a broken seal on a garden window glass pane be repaired without full replacement?
No. Once the seal fails and moisture enters the insulated glass unit, causing permanent haze or inter-pane condensation, the insulating gas is gone. While an individual sash pane can occasionally be reglazed, full unit replacement is usually the most reliable, cost-effective solution for aging garden windows.
Do garden windows add resale value to a home?
Garden windows enhance kitchen aesthetics, bring in abundant natural light, and serve as an attractive visual centerpiece for prospective buyers. While they are a taste-specific architectural feature, a clean, modern, energy-efficient garden window boosts interior charm and overall curb appeal.
How do I find a trusted local garden window replacement contractor near me?
Look for a fully licensed and insured exterior contractor with proven experience in structural window replacements, flashing integration, and local building codes. Experienced local teams provide comprehensive assessments, high-quality materials, and professional installation that protects your home against weather and water intrusion.
Plan a Safer, Longer-Lasting Window Upgrade
A successful garden window replacement brightens your kitchen, gives you a dedicated space for year-round indoor gardening, and protects your home against exterior water damage. Choosing the right combination of durable vinyl or composite frames, advanced Low-E glass, and proper waterproofing flashing helps your new window remain comfortable and leak-free through every season.
Keller Exteriors brings more than 20 years of hands-on exterior construction experience to garden window projects throughout Tulsa, OK; Broken Arrow, OK; Owasso, OK; Jenks, OK; Bixby, OK; Sand Springs, OK; Claremore, OK; Bartlesville, OK; Collinsville, OK; Coweta, OK; Glenpool, OK; Catoosa, OK; and Pryor, OK. Our team can assess damaged framing, recommend an appropriate replacement style, and complete the installation with careful flashing and structural support.
If you are unsure about water damage, structural support, or the right replacement style, contact our garden window replacement specialists at Keller Exteriors for professional guidance.